Monday, July 27, 2009

Daring Bakers Challenge- Cookies


The July Daring Bakers' challenge was hosted by Nicole at Sweet Tooth. She chose Chocolate Covered Marshmallow Cookies and Milan Cookies from pastry chef Gale Gand of the Food Network.

This was a fun challenge. I absolutely love cookies! I mean who doesn't love sweet little morsels that you can pop into your mouth. I was excited when I saw the choice of cookies as well. These are tops on my list of favorites. The Milan cookies were very delicate and tasty. I did make a very rookie mistake when I was whipping these guys up. I didn't incorporate the sugar enough in the first batch and had blobs of sugar in the cookies. I fixed my mistake for the next batch, but I piped the cookies too big. They turned out like spatula's! They may have not been pretty but they were mighty tasty. I kept to the original filling of chocolate and a hint of orange. Yum-O!

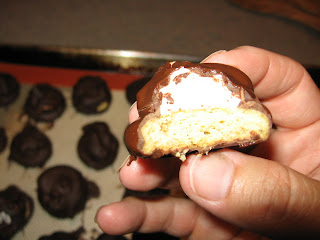
The marshmallow cookies were my favorite. These morsels were fantastic! I loved biting into them and tasting the marshmallow and chocolate on a luscious shortbread type cookie. My kids devoured them. I would definitely make these cookies again.

Mallows(Chocolate Covered Marshmallow Cookies)
Recipe courtesy Gale Gand, from Food Network website
Chocolate Covered Marshmallow Cookies
Prep Time: 10 min
Inactive Prep Time: 5 min
Cook Time: 10 min
Serves: about 2 dozen cookies

• 3 cups (375grams/13.23oz) all purpose flour
• 1/2 cup (112.5grams/3.97oz) white sugar
• 1/2 teaspoon salt
• 3/4 teaspoon baking powder
• 3/8 teaspoon baking soda
• 1/2 teaspoon ground cinnamon
• 12 tablespoons (170grams/ 6 oz) unsalted butter
• 3 eggs, whisked together
• Homemade marshmallows, recipe follows
• Chocolate glaze, recipe follows

1. In a mixer with the paddle attachment, blend the dry ingredients.
2. On low speed, add the butter and mix until sandy.
3. Add the eggs and mix until combine.
4. Form the dough into a disk, wrap with clingfilm or parchment and refrigerate at least 1 hour and up to 3 days.
5. When ready to bake, grease a cookie sheet or line it with parchment paper or a silicon mat.
6. Preheat the oven to 375 degrees F.
7. Roll out the dough to 1/8-inch thickness, on a lightly floured surface. Use a 1 to 1 1/2 inches cookie cutter to cut out small rounds of dough.
8. Transfer to the prepared pan and bake for 10 minutes or until light golden brown. Let cool to room temperature.
9. Pipe a “kiss” of marshmallow onto each cookie. Let set at room temperature for 2 hours.
10. Line a cookie sheet with parchment or silicon mat.
11. One at a time, gently drop the marshmallow-topped cookies into the hot chocolate glaze.
12. Lift out with a fork and let excess chocolate drip back into the bowl.
13. Place on the prepared pan and let set at room temperature until the coating is firm, about 1 to 2 hours.

Note: if you don’t want to make your own marshmallows, you can cut a large marshmallow in half and place on the cookie base. Heat in a preheated 350-degree oven to slump the marshmallow slightly, it will expand and brown a little. Let cool, then proceed with the chocolate dipping.

Homemade marshmallows:
• 1/4 cup water
• 1/4 cup light corn syrup
• 3/4 cup (168.76 grams/5.95oz) sugar
• 1 tablespoon powdered gelatin
• 2 tablespoons cold water
• 2 egg whites , room temperature
• 1/4 teaspoon pure vanilla extract

1. In a saucepan, combine the water, corn syrup, and sugar, bring to a boil until “soft-ball” stage, or 235 degrees on a candy thermometer.
2. Sprinkle the gelatin over the cold water and let dissolve.
3. Remove the syrup from the heat, add the gelatin, and mix.
4. Whip the whites until soft peaks form and pour the syrup into the whites.
5. Add the vanilla and continue whipping until stiff.
6. Transfer to a pastry bag.

Chocolate glaze:
• 12 ounces semisweet chocolate
• 2 ounces cocoa butter or vegetable oil

1. Melt the 2 ingredients together in the top of a double boiler or a bowl set over barely simmering water.

Milan Cookies
Recipe courtesy Gale Gand, from Food Network website
Milan Cookies
Prep Time: 20 min
Inactive Prep Time: 0 min
Cook Time: 1 hr 0 min
Serves: about 3 dozen cookies

• 12 tablespoons (170grams/ 6 oz) unsalted butter, softened
• 2 1/2 cups (312.5 grams/ 11.02 oz) powdered sugar
• 7/8 cup egg whites (from about 6 eggs)
• 2 tablespoons vanilla extract
• 2 tablespoons lemon extract
• 1 1/2 cups (187.5grams/ 6.61 oz) all purpose flour
• Cookie filling, recipe follows

Cookie filling:
• 1/2 cup heavy cream
• 8 ounces semisweet chocolate, chopped
• 1 orange, zested

1. In a mixer with paddle attachment cream the butter and the sugar.
2. Add the egg whites gradually and then mix in the vanilla and lemon extracts.
3. Add the flour and mix until just well mixed.
4. With a small (1/4-inch) plain tip, pipe 1-inch sections of batter onto a parchment-lined sheet pan, spacing them 2 inches apart as they spread.
5. Bake in a preheated 350 degree oven for 10 minutes or until light golden brown around the edges. Let cool on the pan.
6. While waiting for the cookies to cool, in a small saucepan over medium flame, scald cream.
7. Pour hot cream over chocolate in a bowl, whisk to melt chocolate, add zest and blend well.
8. Set aside to cool (the mixture will thicken as it cools).
9. Spread a thin amount of the filling onto the flat side of a cookie while the filling is still soft and press the flat side of a second cookie on top.
10. Repeat with the remainder of the cookies.

Saturday, July 25, 2009

Farmer's Market Revisited


Here is the promised picture of my favorite stone fruit vendor at the farmer's market. If you are in the Sacramento area on Saturday morning, head over to Country Club Plaza and check out his stand and that of the other farmer's stands as well. Matsumoto Farms has the sweetest peaches, plums and nectarines around. I met my friend Lisa who is a fellow blogger, this morning at the market and we bought some of his delicious fruit. We ended up talking for over an hour after that and caught up on what we both have been doing this summer. Very fun! They have Spring Hill Cheese, local honey, olive oil, musical entertainment and tons of beautiful fresh fruits and vegetables. You really can't go wrong.


I was browsing some blogs last week and came across these little gems from GlutenFree Gobsmacked. These are called nut cookies that ooze goodness and are good for you. I made them last weekend when we entertained our very good friends who happen to be allergic to gluten. This recipe really intrigued me. It has oatmeal, flaxseed meal, agave, almond butter and pecans (the original recipe called for walnuts, but I have an allergy to walnuts). The result was a very satisfying cookie. Even my picky kids really liked these cookies. I can see all the possibilities with this recipe. They would be good with chocolate chips added and some grated orange peel or maybe some dried cranberries and raisins. Yum-O!

Sunday, July 19, 2009

Will the heat ever end!


We are in the middle of a 100 plus degree heat wave. This is the part of living in Sacramento that I cannot stand. I detest hot weather. For nine months out of the year the weather is great, but the summer months are at times unbearable. I am not a nice person when the weather gets into the triple digits. I get cranky and a bit surly. Just ask my family. We would love to move up to the Pacific Northwest. Maybe, one day we will make it up there. In the meantime, we deal with the heat. Today's forecast is 103. I guess to look on the bright side, it's not 110!


I went to the farmer's market this weekend and look at these jewels I picked up. They are the sweetest peaches I have ever had. Look how the grower packaged them. He didn't want them to bruise so he packs his gems in these boxes lined with foam. It was like opening up a jewelry box. I will try to take a picture next week of his stand. He grows the absolute best fruit. His nectarines are fabulous!


I know I have been complaining about the heat, but I couldn't resist trying out this new chili recipe. It turned out even better than I thought it would. It is Guy Fieri's recipe from the August/September Food Network magazine. It's called Ryder's turkey chili . I love the complex flavor of the chili. I halved the recipe because the original recipe served 10 to15. I still had a lot of servings and ended up portioning out the servings and freezing the rest. This would be great for a crowd. Serve this chili with some saltine crackers or homemade tortillas. Yummy!

Homemade flour tortillas ( adapted form The Well-Filled Tortilla by Victoria Wise and Susanna Hoffman)

3 cups of unbleached all purpose flour
1/3 cup olive oil
1 teaspoon slat
1 cup of warm tap water

1. Place the flour in a mixing bowl. Add the oil and mix together with a fork or your fingers until thoroughly distributed and the flour is crumbly in texture.

2. Mix the salt with the warm tap water and add to the flour. Mix together with your hands until you can gather the dough into a ball. Place the dough on an un-floured board and knead until smooth and elastic, 3 to 5 minutes. Return the dough to the mixing bowl, cover with a towel, place it in a warmish spot, and let rest for up to 2 hours, but no less than 30 minutes. The dough may be wrapped in plastic and stored in the refrigerator. Use within 1 day.

3. To make the tortillas, divide the dough into 12 equal pieces and roll each between your palms to make a ball. Flatten the balls, then place on a very lightly floured board. With a rolling pin, roll each ball into an 8 to 9 inch very thin round. The uncooked floured tortillas may be layered between sheets of plastic wrap and stored in the refrigerator overnight.

4. To cook the tortillas, heat a heavy cast iron frying pan over medium high heat. Place the tortillas, one at a time or as many as will fit without overlapping, in the pan and cook for 30 seconds. If the tortillas puff up, gently press them down with a spatula. Turn and cook on the other side until speckled with brown spots but still pliable and not crisp, about 3o seconds more. Remove and stack as you go, while the tortillas are still warm. Use the cooked tortillas right away or reheat just before serving.

Thursday, July 16, 2009

Kumihimo

Have you ever heard of it? I had never heard of Kumihimo (pronounced koo- mee-Hee-mo). It is an ancient art of Japanese braiding. Here is how I found out about it. I was browsing Etsy (a very dangerous thing for me) and I came across tastykaeru. I was intriuged with her fiber work and fell in love with her bradied bracelets. Well, of course I had to buy one. I purchased a gingerbread colored bracelet and I am looking forward to receiving it. My curiousity was piqued about this form of braiding and I started to do some research. I found this video on youtube on how to do this braid.


I also found this link from Primative Originals with beginner kits on kumihimo. It looks beautiful and like a lot of fun. I think I will have to try my hand at this.

Wednesday, July 15, 2009

Portobello Parmesan


I was watching Giada De Laurentiis yesterday and she was doing her show on favorite vegetarian dishes. I didn't really pay too much attention until she did her mushroom parmesan. It sounded and looked really good. I decided to give it a try. I didn't follow her recipe per se, but I did use her idea. I took a large portobello mushroom and sliced it into thick slices. I sprayed a casserole dish with cooking spray and spooned in some bottled pasta sauce. The mushrooms were breaded with egg and bread crumbs and browned them in a pan with a little olive oil and butter. I then layered them on top of the sauce, spooned more sauce over the top and finished with some sharp provolone, mozzarella and parmesan. I baked it in a 400 degree F. oven until tender and browned. It was fantastic! I didn't even miss the meat at all. This is a winner and I will definitely be making this again.

Tuesday, July 14, 2009

Cutest library bag

Check out Anna Maria Horners blog here. She has made the cutest book bag from dish towels. She gives a short tutorial on how to. Adorable!

Monday, July 13, 2009

Bountiful


This is what I was able to haul in from our local farmers market this weekend. Yummy! I love going to the farmers market and seeing all the bountiful harvest. I picked up cantaloupes, beans, peppers, tomatillos, corn, herbs, nectarines and plums. Tonight I made pork chili verde using the tomatillos, cilantro and jalapenos that I got at the farmers market. I also made up some homemade tortillas. I forgot how easy they are to make and how much better they taste than the store bought. I combined two recipes for this chili verde. I started with Elise's recipe from Simply Recipes. You can click here to view the recipe. I also used a recipe I already had. It came out really nice. The chili had a lot of depth and the pork was really tender. The tortillas turned out well too! I had to use olive oil for the tortillas because I didn't have any shortening in the house. It still turned out delicious.

Pork Chile Verde

1 1/5 pounds of tomatillos, husked and cut in half
5 garlic cloves, with paper on

Heat broiler and roast for 5 to 7 minutes until skins are nicely brown.

2 small onions, chopped
2 jalapenos, seeded and chopped
1 can green chilies
2 garlic cloves, minced
1 bunch cilantro

Add cooled tomatillos and garlic with skins removed to blender and the onions, jalapenos, green chilies, garlic and cilantro. Blend until smooth. Set aside.

2 to 3 pound pork roast, cubed
flour to coat
Kosher salt and freshly ground pepper
pinch of ground cloves
Olive oil to cook

In a large saute pan or dutch oven, heat oil over medium high heat. Toss cubed pork in flour and salt and pepper, just enough to coat. In batches, brown the pork cubes and set aside. Add pork back to pan and add tomatillo mixture and a pinch of cloves. If meat is not completely covered with mixture, you can add a little of chicken stock. Bring to boil and then simmer until fork tender, about 2 to 3 hours.


Thursday, July 9, 2009

Squaw Valley Vacation


Our family has not been able to get away for a vacation in quite awhile. So it was really nice to be able to escape for a few days and head up to the Lake Tahoe area. Our destination was Squaw Valley, the home of the 1960 winter Olympics. We were able to find a great deal online and stayed at the Village at Squaw Valley. It was like stepping into a Swiss village, very cute and quaint. It is a very family friendly resort with plenty of things to do with the family. The prices are what you would expect for a vacation resort, but there were some very good deals to be found. On Tuesdays, the resort has something they called "Bluesdays". They have special blue dot offers in the village at all the shops and in the evening they offer a free concert in the village square and all the restaurants offer special meals for under $10.00. We were able to stop into Waxen Moon and make our own candles. They also had a 2 for 1 mini golf course special that was spread out all around the village. Part of the fun was trying to find all the holes. I really liked the overall family feel of the resort. The boys were able to ride their scooters and skateboards around the village with relative safety. They also had fun at the arcade. I also really liked that at all the outside seating areas, they had games to play. There was Jenga, Scrabble, Candyland and others. There was also a good little cafe called Soupa. They had a good classic grilled cheese sandwich. If you have kids, you know how important that is. Best of all, it was only $3.00.

We also made it up to High Camp to swim and ice skate. Let me tell you about riding that cable car up to High Camp. That scared the "you know what" out of me. I am totally afraid of heights! You ask why then would you go on a cable car up 2000 vertical feet to High Camp? First off, I thought is wasn't' quite so far. If you look at one of the pictures, you see the cables going up the mountain. I thought, okay, I can grin and bear it for my kids and make it up that short way. No, no, no, it wasn't just up that mountain, but over several mountains. Not only was it a lot longer than I thought, but it was an extremely windy day. Once we got up to High Camp, it was beautiful. The view was incredible. The kids were able to ice skate in an Olympic sized outdoor skating rink. My two youngest kids were able to swim in the swimming lagoon, unfortunately, my oldest had stitches in his leg and was not able to get it wet. The cable car ride back down was a white knuckle ride. I sat in the back so I wouldn't have to look down. My two youngest kids were right up front loving every minute of the steep ride down. My oldest son, keep me company in the back of the car. The scary part was when we were descending at the steepest part of the ride and the cable car began to swing too much. They had to stop the cable car and we were suspended for several minutes just swaying back and forth. I absolutely hated it! I was never so happy to touch ground again. I did some heavy praying up there. Overall, we had a great time and it was nice to get away for awhile.


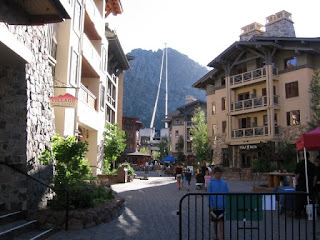
This was the view from our room balcony. It looked out onto the main square. It was a great location, especially on Tuesdays when they had free concerts in the main square.


You can see the cable going up to High Camp. It doesn't look too bad?


The cable car view leaving Squaw Village.


The view from High Camp. It is breath taking!


The boys getting ready to skate.


My little guy showing his prowess on skates.


The swimming lagoon at High Camp


I love this picture. They are in deep thought into how to make the next move.


Candles the boys made at Waxen Moon. It was very fun to make.

Sunday, July 5, 2009

4th of July recap


We had our annual neighborhood parade and it was tons of fun. The kids love it when the big fire engines come to lead our parade. Everyone was dressed up with their finest red, white and blue. After the parade, we hand out otter pops and gave out awards to the best decorated. Check out the last picture. That is how our 4th of July ended.


They won for best decorated wagon.


My little guy and his buddy mug for the camera with the firemen.


Best dressed person.


Murphy and Tessa were not that into the parade this year.


These were the awards I made for this year.


I thought they turned out cute!


This is how our 4th ended. My oldest son was running around in the back yard with friends and fell into a hole. He gashed his leg open and needed 5 stitches. Not the best way to end the festivities.

Saturday, July 4, 2009

Happy 4th of July


Have a safe and happy holiday.

Friday, July 3, 2009

Knitting stripes


This is a neat video on how to knit jogless stripes. If you have ever tried knitting stripes and have been frustrated that they don't meet up, this video clip shows you how.

Front yard revisited


The workers are almost done and the grass is in. I can't believe the transformation. There are touch ups today and then finally clean up and our front lawn is done. I love it! It looks so fresh and I can't believe how big our lawn now looks. Our front yard has always seems choppy to me, but with three trees removed and new lawn in, it looks more cohesive. Just in time for the 4th of July festivities.
Related Posts with Thumbnails